211330 - Subaru Rear Shifter Bushing
- Brandyn Mowat

211330 – Subaru Rear Shifter Bushing
Subaru Impreza WRX 2002 - 2014
Subaru Impreza WRX STi 2004 - 2014
Subaru STi 2015 - 2021
Subaru Forester 2004 - 2008
Subaru Legacy GT, Legacy GT Spec B 2005 - 2009
Subaru Outback XT 2005 - 2009
Scion FR-S, Toyota GT86, Subaru BRZ 2013 - 2019

Congratulations on your purchase of the COBB Tuning Subaru Rear Shifter Bushing! The following instructions will assist you through the installation process. Please read them BEFORE beginning the install to familiarize yourself with the steps and tools needed. If you feel you cannot properly perform this installation, we HIGHLY recommend you take the vehicle to a qualified and experienced automotive technician.
Table of Contents
Parts List
- Rear Shifter Bushing
- (2) Rear Shifter Bolts M6 x
- (2) rear shifter collars
Tools Needed
Sockets
3/8"
1/2"
Misc.
Wrenches
Stock Rear Shifter Bushing Removal
- Park your car in a flat, level area and allow it to cool.
- Lift and support your vehicle properly.
- Unplug the rear o2 sensor by pressing in on the release tab.

- Using a 22mm oxygen sensor wrench remove your rear o2 sensor and set it somewhere safe.

- Start by removing the four 12mm bolts holding the catalytic converter heat shield in place.

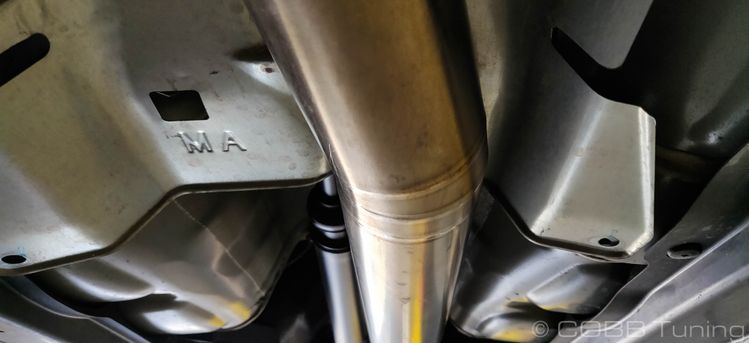

- Remove the heat shield by rolling it towards the passenger's side where there is more space.
- Using your 14mm socket, loosen the center support bearing for the driveshaft. You can leave the bolts partially threaded to keep it from falling.

- Using your 12mm socket and ratchet, remove the two bolts holding the rear shifter bushing in place.


- Pull it down slightly and pop the mount off the end.
Rear Shifter Bushing Installation
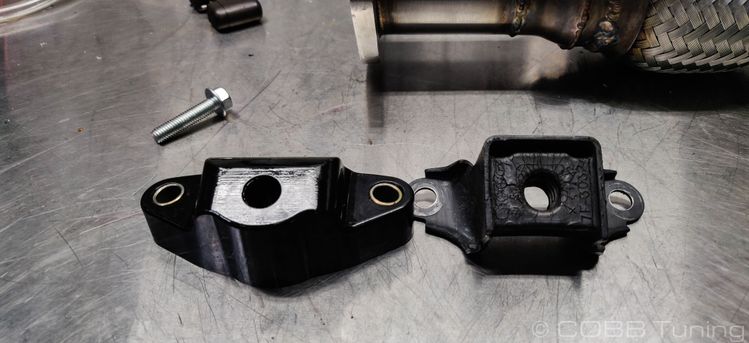
- Add some of the provided lubricant into the inside of the rear shifter bushing.
- Press the small metal collars into each of the bolt holes on either side.

- Install the bushing onto the rear of the shifter arm.

- Using the provided bolts install the rear bushing using a 12mm socket tighten to 13.3 ft-lbs (18Nm)

- Reinstall the components removed in the reverse order of removal. Make sure to add a small amount of anti-seize to the threads of the oxygen sensor before installation.
Stock Front Shifter Bushing Removal (6-speed)
- Follow Steps 1-8 of the previous section.
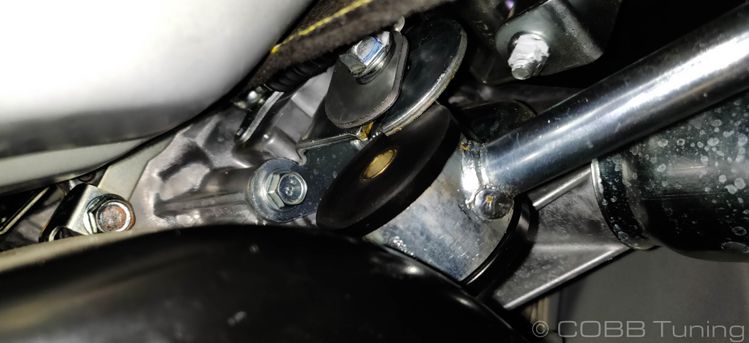
- Using a 12mm wrench, loosen the bolt going through the forward shifter bushing.


- Support the transmission mount with a jack.

- Loosen the four 14mm bolts on the rear lateral (side to side) transmission mount.

- Let the transmission drop down slightly.
- With the space available, pull the front bushing downward to drop it out of the slot.
- Use a screwdriver or a pair of pliers in order to remove the stock shifter bushing.
- Pop the bushing out of the shifter arm using a screwdriver or pliers.

Stock Front Shifter Bushing Removal (5-speed)
- Follow Steps 1-8 of the previous section.
- Using a 12mm wrench remove the nut from the stud holding the stock shifter bushings on.
- Pull away from the transmission to remove the shifter and bushings from the stud.
- Use a screwdriver or a pair of pliers in order to remove the stock shifter bushing.
Front Shifter Bushing Installation
- Add a small amount of the provided lubricant to the inside bore of the COBB Shifter Bushings.
- Install the bushings into either side of the shifter linkage. For 6-speed cars press the inside collar into the front bushings using your fingers.
- Slip the bushing back over the stud (5-speed cars) or add the bolt back into the bushing.

- Push the arm back into place and tighten it down to 23.6 ft-lbs (32Nm)
- You can now lift the transmission mount back up and re-bolt it in place.
Links
COBB Customer Support Web Support and Tech Articles: COBB Tuning Customer Support Center Email: support@cobbtuning.com Phone support available 9am to 6pm Monday-Thursday. 9am to 4pm Friday (CST) 866.922.3059 return to www.cobbtuning.comContact Us:
Copyright 2025 © COBB Tuning Products LLC. All Rights Reserved. | www.cobbtuning.com