771750 - MazdaSpeed 3-port Boost Control Solenoid
- Brandyn Mowat

771750 – Mazdaseed 3-port Boost Control Solenoid
Congratulations on your purchase of the COBB Tuning Mazdaspeed 3-port Electronic Boost Control Solenoid! The following instructions will assist you through the installation process. Please read them BEFORE beginning the install to familiarize yourself with the steps and tools needed. If you feel you cannot properly perform this installation, we HIGHLY recommend you take the vehicle to a qualified and experienced automotive technician.
IMPORTANT! Installing this kit will require use of the approved COBB calibrations.
Table of Contents
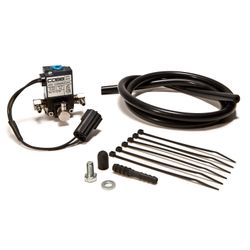
Parts List
- COBB EBCS
- COBB 90 Degree Bracket
- (2) M3 SS Socket head screw
- M6 SS Hex Bolt
- M6 SS Flat Washer
- 72" Silicone vacuum line 1/8" i.d.
- (9) Zip ties 4"
- Plastic "T" adapter
- (2) Vacuum caps
Tools Needed
- Phillips head screwdriver
- Flathead screwdriver
3/8" ratchet
3/8" 10mm socket
- 3/8" 12" extension
3/8" 6" extension
- Needlenose pliers
- Hose cutter or scissors
Stock Part Removal
- Depending on your intake configuration remove the factory airbox or aftermarket intake.
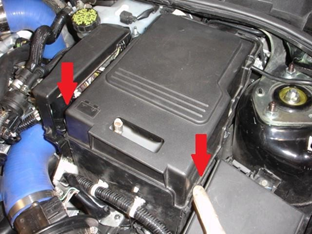
- Remove the battery and ECU covers by using a 10mm socket to remove the battery tie down and loosen and remove both battery terminals (negative first). Now remove the three 10mm bolts that hold the battery box to the car.
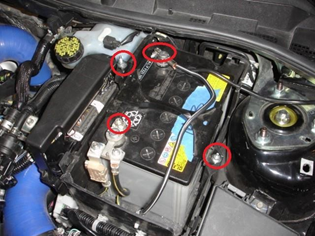
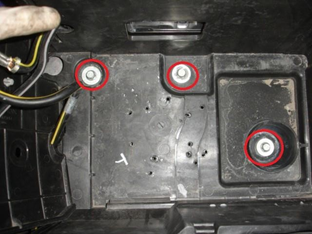
- Using needle nose pliers, remove the plastic pieces away from the front of the battery box and set the front of the box aside.
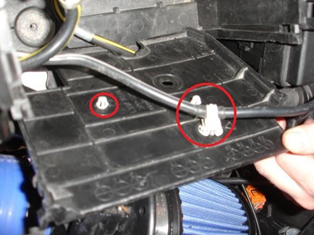
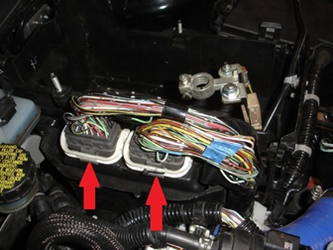
- Disconnect the ECU terminal connectors by depressing the tab in the center of the gray portion of the connector and then lifting up on the white portion of the connector to release them from the ecu. You should now be able to remove the ECU and battery box from the vehicle.
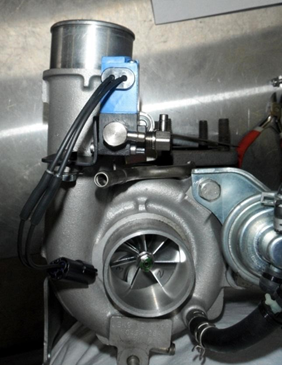
- Locate the factory boost control solenoid bolted to the turbo.
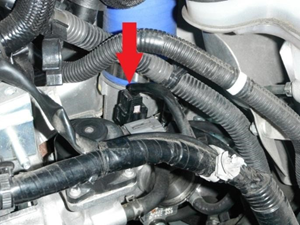
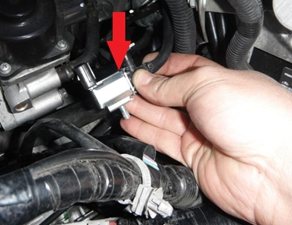
- Unplug the factory harness and remove the single screw holding the solenoid to the turbo using a 10mm socket. From there you can pull the solenoid towards you and disconnect the air lines.
COBB EBCS Installation
- Plug in the COBB EBCS using the factory harness and install on to the turbo using the supplied 6mm hex bolt and flat washer.
- Using the supplied vacuum tubing, begin connecting the EBCS in the configuration shown below.
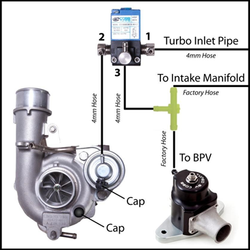
In order to do this- Remove the 6mm vacuum line from the lower port on the wastegate and install the supplied the supplied vacuum cap over the exposed nipple and zip tie it into place.
- Remove the 6mm hose coming from the compressor housing of the turbo and install the supplied vacuum cap over the exposed nipple and zip tie it in place.
- Locate and cut the factory line going between the BPV and intake manifold about halfway between.
- Using the supplied "T" adapter, connect the newly cut line to the "T" and zip tie it in place.
- Using the supplied vacuum line connect the free end of the plastic T to Port 3 on the COBB EBCS and zip tie it in place.
- With the supplied vacuum line, connect and zip tie the top wastegate port to Port 2 on the COBB EBCS.
- Using the supplied line connect the fitting on the turbo inletpipe to Port 1 on the COBB EBCS.
- Reinstall the battery and intake system in reverse order taking your time to make sure all of your hose clamps and plugs are secure and tight.
- Flash the appropriate map for your vehicle with support for the COBB EBCS (Other electronic boost control solenoids, while similar, operate at different frequencies and are NOT INTERCHANGEABLE and will require custom tuning)
External Wastegate Installation
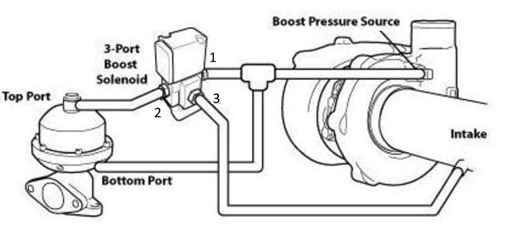
- Hook up the vacuum lines as outlined below.
- Port 1 is T-ed to the bottom port on the external wastegate and an unrestricted boost source. If running an external wastegate with the stock turbo, the compressor housing is restricted and not a suitable source.
- Port 2 is routed to the top port on the external wastegate.
- Port 3 is routed to the intake.
CARB Sticker Application
For details and information on carb legal parts check out our page CARB Executive Orders for COBB Products
(Where Applicable) The product information label is required to aid inspection of the vehicle under the California Smog Check Program.
Apply the supplied CARB sticker in a clear, easy to find location. Typically underhood, or on the radiator core support.
Links
Calibration Map Notes for Mazda Vehicles
Helps to figure out which map you should be on given the parts installed to your car
COBB Customer Support Web Support and Tech Articles: COBB Tuning Customer Support Center Email: support@cobbtuning.com Phone support available 9am to 6pm Monday-Thursday. 9am to 4pm Friday (CST) 866.922.3059 return to www.cobbtuning.comContact Us:
Related content
Copyright 2025 © COBB Tuning Products LLC. All Rights Reserved. | www.cobbtuning.com