/
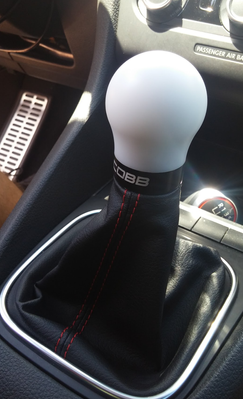
2V1350 - Volkswagen, Audi Shift Knob
2V1350 - Volkswagen, Audi Shift Knob
- Paul Geyman
- Brandyn Mowat
Owned by Paul Geyman

2V1350
VOLKSWAGEN COBB KNOB GTI 2010-2019 USDM, 2009-2018 WM

Congratulations on your purchase of the Volkswagen COBB Knob. The following instructions will assist you through your installation process. Please read them first entirely BEFORE beginning the install and familiarize yourself with the steps and tools needed. If you feel that you cannot properly perform this installation, we HIGHLY recommend you take the vehicle to a qualified and experienced automotive technician.
Part List
- Shift Knob
- Insert
- ACT Cobra 7" Cable Tie
- 2.5mm Hex Key
- M5x8mms Set Screw
Tools Needed
- Cutting Pliers
- Flat Head Screwdriver
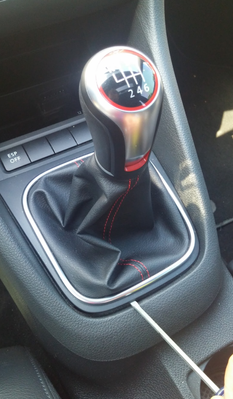
Removal of Stock Shift Knob
- To begin the removal of the stock shift knob, first remove the boot. Use a flathead screwdriver to gently pry open the trim lining the base of the boot. Once the boot is detached, be sure not to break a clip while removing.
- Now that the boot is detached from the base, you can lift the boot up to where you can see a retaining crimp clamp. You should be able to insert a flathead screwdriver into the ear, and twist, to loosen the clamp to where you can slide the stock plastic adapter off of the shifter shaft.
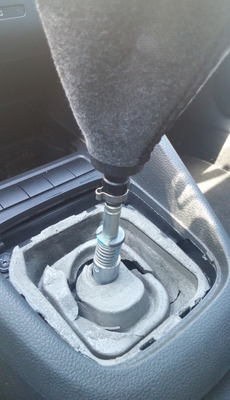
- Once the boot and adapter are removed, remove the boot from the adapter. Use a flathead screwdriver or any desired tool to loosen the adapter off of the boot. This step may take patience! (Or brute force if you don't plan on keeping the stock knob! Not recommended!)
Installation of COBB Knob
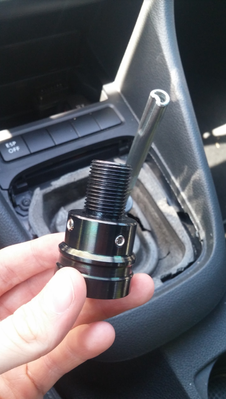
- Begin installation of the COBB Knob by lightly screwing in the set screws into the provided threaded holes on the adapter. Make sure you do not thread them on too far to where you can no longer slide the adapter over the shaft. You can rather thread these on by hand or use the provided 2.5mm hex key if needed.
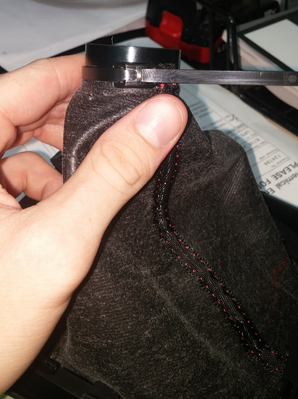
- Before placing the adapter on the shaft, connect the boot to the adapter using the provided ACT Cobra 7" Cable Tie. Once the tie is tight, clip off the excess using a pair of cutting pliers or your desired snipping tool.
- Now place the adapter onto the shaft. Make sure that you do so in the correct orientation so that the boot can now clip back into its original location without twisting the boot. Tighten the set screws when the adapter is in your desired location. Just make sure that the adapter is not placed too low to where the knob bottoms out on the top of the shaft. Use the provided 2.5mm hex key to do so.

- Once the set screws are tight and the adapter is tight onto the shaft, you can complete the install by threading on the knob! If the knob does not clock to where the logo is facing your desired orientation, repeat step 3 but adjust the rotation of the adapter to where the logo will clock correctly. You may need to gently slide the boot area under the Cobra tie to where the boot does not get twisted if you adjust step 3.
- Congratulations on the purchase and installment of your new Volkswagen COBB Knob!
Links
The main resource page for MK7 GTI Installation Instructions
The main resource page for MK7 GTI Installation Instructions
Error rendering macro 'excerpt-include' : You can only link to a page or blog post.
Related content
Volkswagen & Audi (Universal-ish) Shift Knob
Volkswagen & Audi (Universal-ish) Shift Knob
More like this
FK8 Shift Knobs
FK8 Shift Knobs
More like this
FL5 Shift Knobs
FL5 Shift Knobs
More like this
Weighted COBB Knob
Weighted COBB Knob
More like this
NexGen Micro Knob
NexGen Micro Knob
More like this
8V2300 - Volkswagen MK7, MK7.5 Boost Tap (Discontinued)
8V2300 - Volkswagen MK7, MK7.5 Boost Tap (Discontinued)
More like this
Copyright 2025 © COBB Tuning Products LLC. All Rights Reserved. | www.cobbtuning.com