9C1400 - GT-R Rear Sway Bar Endlink [Discontinued]

9C1400 - GT-R Rear Sway Bar Endlink
09-12 GT-R
Congratulations on your purchase of the COBB Tuning GT-R Rear Sway Bar Endlink Kit! The following instructions will assist you through the installation process. Please read them BEFORE beginning the install to familiarize yourself with the steps and tools needed. If you feel you cannot properly perform this installation, we HIGHLY recommend you take the vehicle to a qualified and experienced automotive technician.
Table of Contents
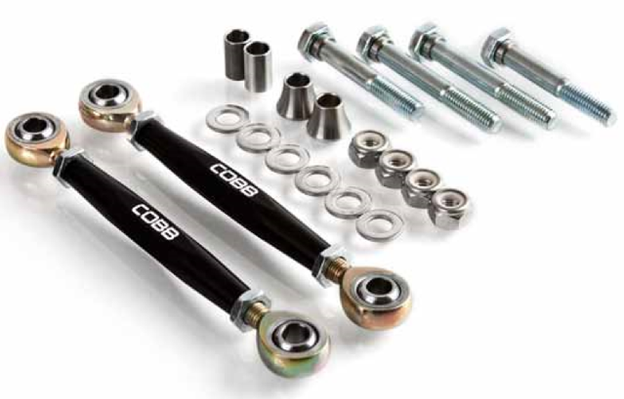
Parts List
- (2) Adjustable Endlinks
- (4) Small Spacers
- (2) Large Spacers
- (2) Bolt 65mm Long
- (2) Bolt 75mm Long
- (4) Nylock Nut
- (6) Stainless Steel Washers
Tools Needed
3/8" ratchet
- 14mm Open end wrench
- 16mm Open end wrench
- 17mm Open end wrench
14mm 3/8" socket
- 17mm 3/8" Socket
Removal of Stock Endlinks
- Start by placing a block in front of the front tire to keep the car from rolling forward. Now, lift the rear of the GT-R with a jack and support the car with jack stands.
- 2. Once car is safely secure, use a 14mm open end wrench or 14mm socket and remove the 14mm hex nuts on the top and bottom of the end link and remove the endlink. This may require the use of (2) open ended 14 mm end wrench’s or an open end wrench and a socket. Depending on the weather conditions the car has been exposed to, you may need to use some penetrating fluid on the treads to make sure that you don’t strip out the end link stud.
Installation of COBB Adjustable Endlinks
- Before installing the COBB Tuning Adjustable Endlinks, using a tape measure, measure the center to center distance of the stock endlink and adjust the COBB endlink by loosening the jam nuts and turning the center of the endlink to match the center to center distance of the stock endlink.
- Install the endlink to the chassis following the diagram below. You will need to use a 17mm open end wrench and 17mm socket to tighten the nuts. If at all possible place a small amount of anti-seize on the threads of the new hardware before installation. Factory torque spec is 41 ft-lbs.
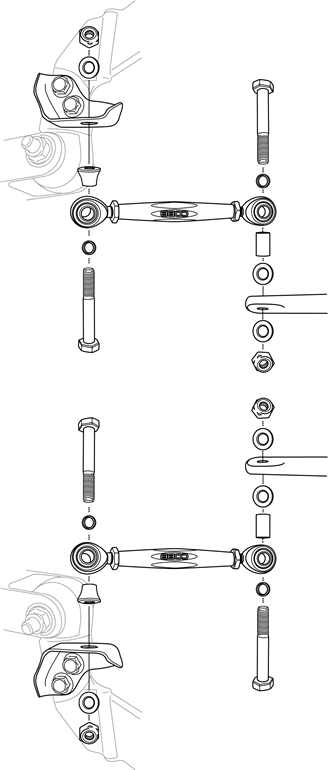
- Install the endlink to the anti-swaybar following the part order in the diagram above. Again if at all possible place a small amount of anti-seize on the threads of the new hardware before installation. Factory torque spec is 41 ft-lbs.
- Repeat step 2 for the other endlink. DO NOT attach the endlink to the swaybar on both sides unless all the weight of the car is on the rear tires, i.e. the car is on the ground or on ramps. If you do attach both endlinks to the swaybar, the bar will be preloaded and not work optimally.
- If the car is not on the ground or ramps, lower the car so that the weight of the car is on the tires.
- Install the unattached endlink to the swaybar by adjusting the height of the endlink so that the bolt will easily slid through the endlink and swaybar without any or little resistance. By doing so the swaybar will not be preloaded. If at all possible place a small amount of anti-seize on the threads of the new hardware before installation. Factory torque spec is 41 ft-lbs.
- Once all the nylock nuts are tightened, use a 16mm and 17mm open end wrench to tighten the jam nuts to the center endlink body.
- Congratulations, you have successfully installed your COBB Tuning Adjustable Endlinks.
Contact Us:
COBB Customer Support
Web Support and Tech Articles: COBB Tuning Customer Support Center
Email: support@cobbtuning.com
Phone support available 9am to 6pm Monday-Thursday. 9am to 4pm Friday (CST)
866.922.3059
return to www.cobbtuning.com
Copyright 2023 © COBB Tuning Products LLC. All Rights Reserved. | www.cobbtuning.com