Accessport
User Guide BMW
N54 BMW
N55 BMW
Product Introduction
Congratulations on the purchase of the Accessport handheld programmer. The Accessport is the industry leading OEM ECU flashing, managing and monitoring assistant. Unlock power hidden within the ECU by replacing conservative factory settings with more aggressive calibrations. The result is impressive gains in torque and horsepower while maintaining a high degree of safety. The Accessport can:
- Reprogram the factory engine control unit (DME) with improved tuning parameters through the on-board diagnostic (OBD-II) port.
- Monitor and log vehicle sensor data using on-screen digital gauges.
- Read and clear engine diagnostic trouble codes (DTCs).
- Measure 0-60mph, and ¼ mile times.
Supported Vehicle List
AP3-BMW-001
2008 - 2010 135i
2011 1M
2007 - 2010 335i
2007 - 2008 335xi
2009 - 2010 335i xDrive
2011 - 2013 335is
2008 - 2010 535i
2008 535xi
2009 - 2010 535xi
2009 - 2014 Z4i
2011 - 2014 Z4iS
AP3-BMW-002
2011 135i
- 2011 335i
- 2011 335xi
- 2011 X5 xDrive35i
- 2011 X6 xDrive35i
In-Box Contents
WARNING! |
|---|
| Installation and use of the Accessport may void all or a portion of the vehicle manufacturer's standard warranty. There is no guarantee expressed or implied by COBB Tuning or any of its affiliates for the use of the Accessport. The user accepts all risks and responsibilities when using the Accessport. |
| WARNING! |
|---|
| Use of the Accessport while operating a moving vehicle is strictly prohibited by law. COBB Tuning and its affiliates accept no responsibility for damages or injury caused by misuse of the Accessport. |
| WARNING! |
|---|
| The Accessport may not be able to function if the vehicle's wiring has been modified. If problems occur while using the Accessport, please verify that all wiring to and from the ECU is correct and functional. |
Accessport Installation
Mounting Options
A universal 'sticky' mount is included with the Accessport. For the best results, we recommend installing the mount vertically, and preparing the mounting surface with the included alcohol wipe.
- NOTE: It's important to note that not all surfaces provide a strong adhesive bond.
- NOTE: The Accessport cradle is compatible with "Dual T" style mounts.
Pre-Installation
The Accessport comes with the most up-to-date software and map files available at the time of shipment. However, it is possible that updated software and/or map files have been made available since the time of shipment. Therefore, the recommended procedure is to connect the Accessport to the AP Manager software and download the latest firmware for the target vehicle. Please visit www.cobbtuning.com/apmanager to download AP Manager and to find a link for the AP Manager manual.
If you have issues transferring maps or updating the Accessport while using USB 3.0 ports, please try using a USB 2.0 hub adapter.
NOTE: The Accessport is preloaded with a default set of maps for all cars that it supports. This may include but is not limited to Stage1, Stage2, Stage3 (all octanes), Anti-theft, Economy, and Valet. If you would like to view all maps available you can visit the BMW Tab in the Maps section of our website.
| IMPORTANT! |
|---|
Before installing the Accessport on the vehicle, it is important to verify that the vehicle is adequately prepared for the installation process. Since the Accessport uses the vehicle’s battery for power and the ECU reprogramming process requires adequate battery power as well, it is critical to verify that the vehicle’s battery has a good charge. This can be done through the use of a battery charger/conditioner or by driving the vehicle for a period of time prior to installation to allow the alternator to recharge the battery. Furthermore, please ensure that all in-car electronic devices are turned off to reduce power draw on the battery. This includes car stereos, video screens, GPS units, radar detectors, interior and exterior lights, and any other electronic device that uses the car battery for power. |
Screen Capture
Screenshots can be captured by holding down the [CANCEL] button for two seconds. Any stored screen captures can be retrieved by using Accessport Manager.
First Installation
- You will need the Accessport and OBD-II Cable to perform the installation. Make sure the car is still in the off position.
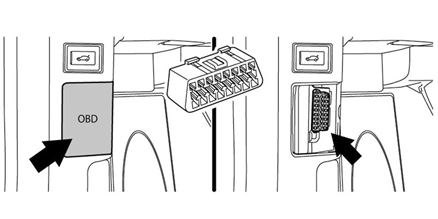
- Locate the vehicle's OBD-II port. The location may vary depending on the exact model of vehicle.
- Plug the OBD-II cable into the port in the dash of the vehicle.
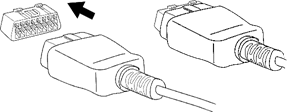
- Connect the small end of the OBD-II cable to the port in the bottom of the Accessport by pressing down on each of the two tabs to release the locks, then let go after firmly pressing the end of the cable into the receptacle on the Accessport.
- Make sure the clasp on the OBD-II cable firmly engages with the port.


