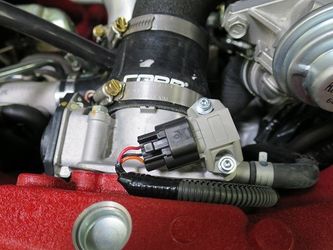
Congratulations on your purchase of the COBB Subaru 4 Bar MAP Sensor! The following instructions will assist you through your installation process. Please read them first BEFORE beginning the install and familiarize yourself with the steps and tools needed. If you feel that you cannot properly perform this installation, we HIGHLY recommend you take the vehicle to a qualified and experienced automotive technician.
Part List
- COBB 4 Bar MAP Sensor
- 2 x Hex Screws
- 2 x Locking Washers
Tools Needed
- 3mm Hex Key
- Phillips Head Screwdriver
Removing Factory MAP Sensor
- With the hood of your vehicle open, locate the factory MAP Sensor located on the top of the throttle body.
- Unclip the connector from the factory sensor by pressing down on the tab at the rear of the connector.
- Using a phillips head screwdriver, remove the two screws securing the factory sensor.
- Pull straight up to remove the sensor, it may require a bit of force due to the o-ring.
Installing COBB 4 Bar MAP Sensor
- Insert the COBB 4-Bar MAP Sensor, being careful not to damage the o-ring.
- Use a 3mm hex key to install the provided screws with locking washers
- Plug in the connector, be sure to verify it is locked into position.
Calibration Data
Sensor calibration:
Multiplier = 14.504 psi (1.000 bar)
Offset = -7.252 psi (-0.500 bar)
Suggested DTC limits:
low: 0.25V
high: 4.75V
Links
Subaru Installation Instructions
Main Installation Instruction Repository for Subaru Parts
Link to Subaru Map Notes to see what map you should be on given the parts you've added
Customer Support
Phone support available 9am to 6pm Monday-Thursday. 9am to 4pm Friday (CST)
866.922.3059


