712750, 715750
COBB 3-PORT ELECTRONIC BOOST CONTROL SOLENOID
Part List (712750)
- 1 x COBB EBCS
- 1 x COBB Mounting Bracket
- 2 x M3 SS Socket Head Screw
- 2 x M6 SS Hex Bolt
- 4 x M6 SS Flat Washer
- 2 x M6 SS Lock Washer
- 2 x M6 SS Nuts
- 72” 4mm Silicone Vacuum Line
- 6 x 4” Zip/Cable Ties
Parts List (715750)
- 1 x COBB EBCS
- 1 x COBB Mounting Bracket
- 2 x M3 SS Socket Head Screw
- 1 x M6 SS Hex Bolt
- 1 x M6 SS Flat Washer
- 36” 4mm Silicone Vacuum Line
- 6 x 4” Zip/Cable Ties
- 10mm Deep Socket
- 10mm Socket
- 12mm Socket
- Flat Head Screwdriver
- Ratchet
- Needle Nose Pliers
- Scissors
Important! Before beginning work, make sure the engine is cool to the touch! You will be working very near/touching the turbocharger!
02-05 WRX and 04-05 STi (P/N 712750)
06-07 WRX and STi (P/N 712750)
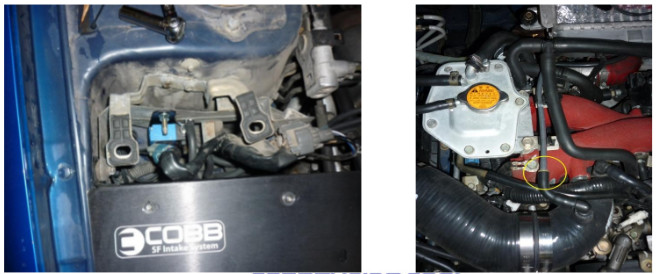
1) Using a 10mm socket, remove the nuts that secure the bracket on the passenger side of the engine bay that holds the boost control solenoid.
2) Unplug all the factory vacuum lines and the factory electrical connect.
3) Using a 10mm socket, remove the factory boost control solenoid and replace the it in the same place with the COBB EBCS unit by using the factory nuts or the supplied hardware if needed.
4) Follow the factory vacuum lines that were removed from the factory solenoid and remove them from where they terminate. One line will tee off into two lines and terminate on a WG nipple and a
compressor housing nipple. The other line will terminate into your turbo inlet hose. There is a plastic fitting about 4" from your turbo inlet hose where two hoses connect. Remove the hose that is
between the boost solenoid and the plastic fitting.
5) Using the supplied 4mm vacuum hose, press one end over the plastic turbo inlet fitting and route the hose back to the COBB solenoid. Cut the vacuum line to and appropriate length and press
the end of the line onto PORT 1 on the COBB solenoid.
6) Using the supplied 4mm vacuum hose, press one end over the wastegate nipple and route the hose back to the COBB solenoid. Cut the vacuum line to and appropriate length and press the
end of the line onto PORT 2 on the COBB solenoid.
7) Using the supplied 4mm vacuum hose, press one end over the compressor housing nipple and route the hose back to the COBB solenoid. Cut the vacuum line to an appropriate length and
press the end of the line onto PORT 3 on the COBB solenoid.
8) Ensure all the lines are neatly routed and tucked with no kinks in the line all while being fully seated onto the barbs of all the connection and secure them with the included 4" zip ties. Trim the
ends of the ties with scissors.
9) Go back and tighten the 10mm nuts that secure the COBB solenoid to the vehicle.
10) Reinstall the lid that covers the solenoid housing.
11) Enjoy the reduced response time and greater precision of your new COBB EBCS!
Remember ! You MUST properly tune for the installation of a 3-port EBCS. Using an off-the-shelf tune will result in overboosting!
08+ WRX and 2005+ LGT (P/N 715750)
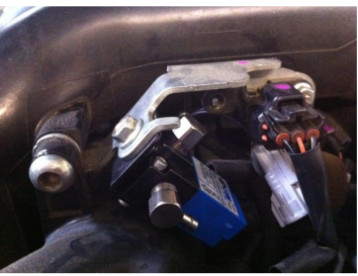
1) Legacy GT owners need to remove the factory engine cover to gain access to the factory boost control solenoid.
2) Using a 10mm wrench, remove the factory boost control solenoid found on the passenger side of the intake manifold.
3) Unplug the factory connector and remove the factory vacuum lines from the solenoid.
4) Install the COBB EBCS and bracket into the same location using the factory bolt.
5) Follow the factory vacuum lines that were removed from the factory solenoid and remove them from where they terminate. One line will tee off into two lines and terminate on a WG nipple and a
compressor housing nipple. The other line will terminate into your turbo inlet hose. There is a plastic fitting about 4" from your turbo inlet hose where two hoses connect. Remove the hose that is
between the boost solenoid and the plastic fitting.
6) Using the supplied 4mm vacuum hose, press one end over the plastic turbo inlet fitting and route the hose back to the COBB solenoid. Cut the vacuum line to an appropriate length and press
the end of the line onto PORT 1 on the COBB solenoid.
7) Using the supplied 4mm vacuum hose , press one end over the wastegate nipple and route the hose back to the COBB solenoid. Cut the vacuum line to an appropriate and press the end of
the line onto PORT 2 on the COBB solenoid.
8) Using the supplied 4mm vacuum hose, press one end over the compressor housing nipple and route the hose back to the COBB solenoid. Cut the vacuum line to an appropriate length and
press the end of the line onto PORT 3 on the COBB solenoid.
9) Ensure all lines are neatly routed and tucked with no kinks in the line all while being fully seated onto the barbs of all the connections and secure them with the included 4" zip ties. Trim the
ends of the ties with scissors.
10) Go back and tighten the 10mm bolt that secures the COBB solenoid to the vehicle.
11) Reinstall the engine cover.
12) Enjoy the response time and greater precision of your new COBB EBCS!
Remember! You MUST properly tune for the installation of a 3-Port EBCS. Using an off-the-shelf tune will result in overboosting!
04-08 Forester XT (P/N 712750)
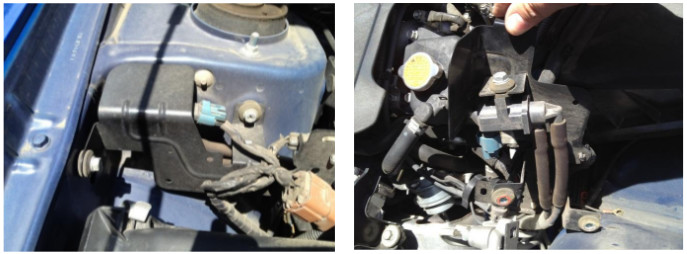
1) Using a 10mm socket, remove the three screws that secure the bracket on the passenger side of the engine bay that holds the boost control solenoid.
2) Unplug all the factory vacuum lines and the factory electrical connect.
3) Using a 10mm socket, remove the factory boost control solenoid and replace it in the same place with the COBB EBCS and bracket by using the factory nuts or the supplied hardware if needed.
4) Follow the factory vacuum lines that were removed from the factory solenoid and remove the them from where they terminate. One line will tee off into two lines and terminate on a WG nipple
and a compressor housing nipple. The other line will terminate into your turbo inlet hose. There is a plastic fitting about 4" from your turbo inlet hose where two hose connect. Remove the
hose that is between the boost solenoid and the plastic fitting.
5) Using the supplied 4mm vacuum hose, press one end over the plastic turbo inlet fitting and route the hose back to the COBB solenoid. Cut the vacuum line to an appropriate length and press
the end of the line onto PORT 1 on the COBB solenoid.
6) Using the supplied 4mm vacuum hose, press one end over the wastegate nipple and route the hose back to the COBB solenoid. Cut the vacuum line to an appropriate length and press the
end of the line onto PORT 2 on the COBB solenoid.
7) Using the supplied 4mm vacuum hose, press one end over the compressor housing nipple and route the hose back to the COBB solenoid. Cut the vacuum line to an appropriate length and
press the end of the line onto PORT 3 on the COBB solenoid.
8) Ensure all lines are neatly routed and tucked with no kinks in the line all while being fully seated onto the barbs of all the connections and secure them with the included 4" zip ties. Trim the
ends of the ties with scissors.
9) Go back and tighten the 10mm nuts that secure the COBB solenoid to the vehicle.
10) Enjoy the reduced response and greater precicion of your new COBB EBCS!
Remember! You MUST properly tune for the installation of a 3-port EBCS. Using an off-the-shelf tune will result in overboosting!
08+ STi (P/N 715750)
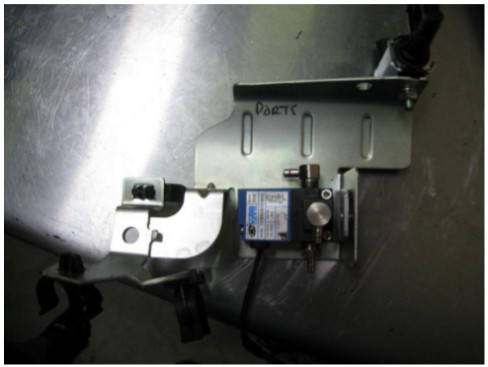
1) Using a 10mm and 12mm socket, remove the nuts that secure the bracket on the passenger side of the intake manifold that holds the boost control solenoid under it.
2) Unplug all the factory vacuum lines and the factory electrical connector.
3) Install the COBB EBCS and bracket onto the factory bracket as shown below.
4) Follow the factory vacuum lines that were removed from the factory solenoid and remove them from where they terminate. One line will tee off into two lines and terminate on a WG nipple and a
compressor housing nipple. The other line will terminate into your turbo inlet hose. There is a plastic fitting about 4" from your turbo inlet hose that joins two hoses end to end. Remove the hose
that is between the boost solenoid and this plastic fitting.
5) Using the supplied 4mm vacuum hose, press one end over the plastic turbo inlet fitting and route the hose back to the COBB solenoid. Cut the vacuum line to an appropriate length and press
the end of the line onto PORT1 on the COBB solenoid.
6) Using the supplied 4mm vacuum hose, press one end over the wastegate nipple and route the hose back to the COBB solenoid. Cut the vacuum line to an appropriate length and press the
end of the line onto PORT 2 on the COBB solenoid.
7) Using the supplied 4mm vacuum hose, press one end over the compressor housing nipple and route the hose back to the COBB solenoid. Cut the vacuum line to an appropriate length and
press the end of the line onto PORT 3 on the COBB solenoid.
8) Ensure all lines are neatly routed and tucked with no kinks in the line all while being fully seated onto the barbs of all the connections and secure them with the included 4" zip ties. Trim the
ends of the ties with scissors.
9) Reinstall the factory bracket that holds the EBCS in place onto the intake manifold.
10) Enjoy the reduced response and greater precision of your new COBB EBCS!
Remember! You MUST properly tune for the installation of a 3-port EBCS. Using an off-the-shelf tune will result in overboosting!
External Wastegate Installation
1) Hook up vacuum lines as outlined below.
a. Port 1 is T-ed to the bottom port on the external wastegate (not on the top) and the compressor housing (boost pressure source).
b. Port 2 is routed to the top port on the external wastegate.
c. Port 3 is routed to the intake.


